Calling Card Challenge
CALLING CARD
This card was made for a Design Challenge. The challenge stated that the card had to have some rubber stamping as well as an A.T.C [Artist trading card]
Here is my entry into that challenge.
MATERIALS NEEDED
ATC [See seperate How to make Section for how l made this]
2 sheets Card Stock A4
Several sheets of backing paper to use for mat and layering
A5 Sheet Card. I used the back of a cerial packet
Grande Caliber [This can be changed to fit in with your needs and what Embossing/cutting machines you have. You can get the same result using a template pre-cut or made yourself]
Set of nestibilities Dies [I used Grand Labels One]
I smaller Nestibilitie Die for the leather Look Topper
12” Ribbon
Vintage Photo Distressing Ink
Creative Expressions 'Swirl' Stamp Set
Gold Embossing Powder
Heat Gun
Brown Liquid Boot Polish [All will be explained!]
Normal Crafty equipment we have. Scissors, Craft Knife, Ruler etc
Selection of small Glass beads, Needle, Thread
Good Quality Strong Glue
Double sided tape
ARTIST TRADING STAMP HOW TO MAKE
Firstly A.T.C are made 2.5 inches by 3.5inches or 63mm x 89mm.
A SHORT HISTORY OF ARTIST TRADING CARDS
Artist Trading Cards have been around for less than a decade. Yet, their historical roots can be traced back to the Mail Art and Fluxus movements of the 1960s, and even earlier to the Dadaist movement of the 1920s.
Swiss artist M. Vänci Stirnemann first developed the concept of Artist Trading Cards in 1996, when he decided to document his activities with other artists by producing a catalogue of 1,200 cards he created by hand. He exhibited the cards at his bookstore gallery in Zürich in May 1997. On the last day of the exhibit, Stirnemann invited anyone who wanted a card to create their own ATC to trade during the closing reception.
Canadian artist Chuck Stake (aka Don Mable) attended Stirnemann’s exhibition that May and also participated in a Trading Session while in Zürich. Stake became very enthusiastic about ATCs and collaborated with Stirnemann to stage “The First International Biennial of Artist Trading Cards” at The New Gallery in Calgary, Canada that included 80 artists from 10 different countries. Since then, with the help of the Internet, interest in ATCs has spread around the globe.
Taken from http://www.artjunction.org/atcs.php
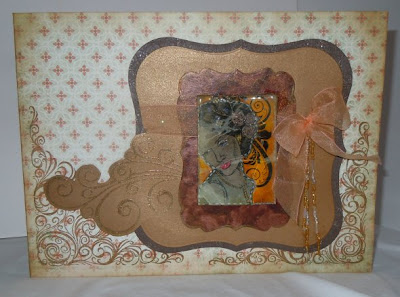
I made my ATC by stamping an image onto a piece of white paper. This when dry was cut out and put aside. The base of the card was yellow [I used the colour from the box front] I over stamped this with a swirl. Taking the stamped image on the white paper l then coloured the image using pro-markers and gelly roll glitter/gold pens. This image was then glued onto the yellow card. I used a white pen and did fake stitching around the image.
The l took a Perfect medium pad l gave the card a coating. Then l dipped the card into Ultra Thick Embossing powder. This powder is a lot courser than the normal powder and its made for heavy deep embossing.

Using my heat gun l melted the powder. While it was still warm l put another coat of Thick embossing powder. Again l heated this. When it had melted and cooled this time l used my Perfect medium pad again. Then l placed another layer of Ultra Thick Embossing Powder. The finished glaze made the ATC look like it had been glazed as in Pottery.
When it was cooled l then carefully snapped the card in a few places. This caused the surface to crack. Dont worry l wanted it to look like a glass that had been cracked. If your not happy with the result all you have to do is just use your heat gun and re melt the glaze.
HOW TO MAKE THE CARD
To make the Leather look topper all you do is take some card and your liquid polish and just dab away. The more bubbles that you get onto the card the better as this will when dry give you that leather look. Also as some one says 'Its Cheap as Chips' Put aside for a few hours to dry. Then give it a buff with a cloth to remove any polish that might be left on the surface. Take one of your dies and then using your embossing/cutting machine cut out giving enough area around your ATC to give it a grounding. [You dont want it to look as if its an after thought you want it to be part of the design.
Lets make the Grande Labels One toppers!
Taping the largest die onto your bottom paper put through your embossing/cutting machine put to one side.
Now then this is where some thinking and some quietness is going to be needed. [so go and grab that cuppa!]
This part of the card does need some thinking and construction.. Place the 2nd die onto a sheet of card your going to make the 'Out of the box' layer. Also place insde this box the leather topper that you had cut out. Using this as a frame you can mark lightly with pencil where the stamped image can start and end. [You can cover the start by placing the leather topper over it. This will make the image feel part of the design. Give it some flow.
When l had my starting point i made a small pencil mark, where the stamped image would finish on the inside of the frame. Inking up my stamp with Vintage Distressing Ink l stamped my image.
Once l had stamped the image l gave it a coating of the Golden Embossing powder. Using the heat gun l heated and melted the powder.
Placing the 2nd Nestibilitie die onto the paper you mark where the stamped image will fly out of the box. When your happy with this cut aound the stamped image up to the marked points you have made for the die. [If your not comfortable doing this with your Die/Embossing machine you can use many of the plastic templastes that are available for us crafters. If you want to use your machine try on scrapes of paper first. Just use a scrap of card and a smaller die just experimehnt cutting round your stamped image. All your going to waste is some waste card. Its worth the effort as the end result is spectacular.
When l was happy with the placement of the die l taped it into place and then ran it through my Caliber
Start to build up your toppers. .Secure the leather look topper onto the 'O.O.T.B.Inking topper. Take your ribbon and wrap round the front. You dont have to go all the way round as your going to glue this onto the base topper so why waste ribbon?
I then strung 3 strands of small glass beads that l had in my crafty collection. You dont have to add these its just something l wanted to try to give it some movement. These were then sewn into place. This also help[ed me gather the ribbon so that when l glued the ribbon into place it looked as if the bow was part of the ribbon.
Then l glued my ATC into place and secured.
Taking one of the A4 cards l covered it with a complimentary paper. The edges were then inked with Vintage Distressing ink. The bottom was then stamped using one of the 'Swirl' stamps.
Take card and mark approx half an inch and then score. This will be used to glue the back of the card onto the front..
Remember the side that you have folded over will need to be distressed using the Vintage Distressing Ink
Build up the Card as you want to and stamp any centiment onto the card. You can use any pre made topper. Remember that you will need to tie all extra embelsihments into the colour scheme. This can be done by just inkling around the edges. This will not make the embelsihment stick out and spoil your card and the trouble you have gone to to make it.
There you have it your completed card.
If you have any problems in the construction of the card please contact me and l will do my best to help you out.
Keep Crafting
Alan


Comments
Post a Comment
Please leave your message here. As soon as it has been verified it will be shown on the blog. This is to just keep out spammers and people who would like to sell their products and not show an interest in what they have see on my blog. Thanks for your patience in this matter