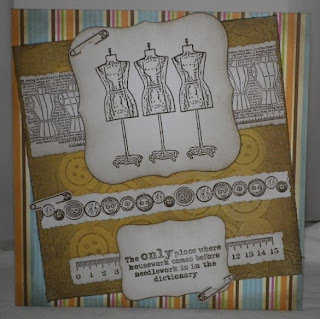
Vintage Sewing Card
I paid a visit to CleverCuts and the fab Ali was there. She is one of the few Card Demonstrators l admire. She has the same outlook when it comes to card making as myself. if you get the chane have a look at her web site. It is also the web site for some of the best stamp sets around 'Pilkington Woods/Cottage' There are some more stamps ready to be added to the set and they are just must have if you like the others. Anyway l bought two masks that l have wanted for a while. Jigsaw and Buttons. I was eager to then have a play.
MATERIALS NEEDED
Stamp set 'Vintage Sewing'
Back of a Cereal Box
'Buttons' Mica Mask
Sand texture Gel
White Gesso Primer
Paint Brush
2 Shades Yellow Acrylic paint [l used old paint testers]
Baby Wipes
Vintage Destressing Ink Pad
Deckled Scissors
Various sizes of Nestibilities Dies
2 A4 White Card Stock
A4 Sheet Complimentary Paper Stock
Dimentional on a Roll Black prefered
Pinflare Glue
Scissors
Craft Knife
Metal Ruler
The first one l made was a card using the stamp set called 'Vintage Sewing' and The Button Mask
Firstly l cut down an old cereal box and then using the inside l covered the mask with a Sand Texture Gel.
This was set aside to dry.
Then it was given a coat of White Gesso Primer to give it a key to paint on.
Taking two different shades of yellow l mixed the paint on the card so that it had different shading. The surface was then given a gentle wipe using a baby wipe so that l could control where l wanted a layer of paint that was thicker than another part of the topper.
When it was dry l took a pair of scissors and using them l distressed the edges and then using Vintage Photo and gave the topper a distressed look
The toppers were them printed onto white card stock. In some cases l did multi stamping to build up an image
To make up the card l first measured the Button topper and added a good border around it. Then l covered it with a old looking striped paper. The button topper was then glued into place using Pinflares glue at an angle.
I didn’t want the topper to be straight head on as l wanted it to stand out when it would be placed alongside other cards. Play around with how your toppers are placed there is no written rule it has to be square.
The edge of the card was then distressed using the same ink pad.
Looking at my stamped images l started to build up the image before any glue touched the card.
When l was happy l then took some black dimensional on a roll and raised both the Body frame and the wording above the bands of images l had stamped. I wanted this card to be very tactile and dimensional.
I will post the other card l made using the Jigsaw Mica Mask on friday as l used almost the same techniques that l did with this card.
Keep Crafting and be happy
Alan
Will do a proper blog later as lm still trying to sort a few things out.


Comments
Post a Comment
Please leave your message here. As soon as it has been verified it will be shown on the blog. This is to just keep out spammers and people who would like to sell their products and not show an interest in what they have see on my blog. Thanks for your patience in this matter