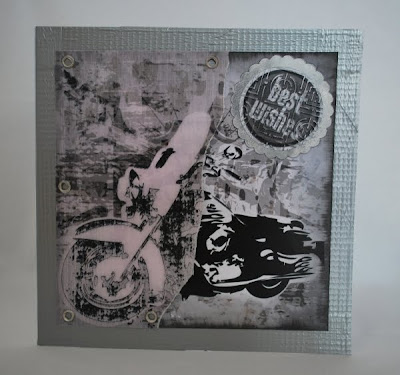
HAPPY BIKERS BIRTHDAY

Well then this is my first entry into what l hope will become a full on adventure and relationship.
Im just going to be using 99.99999% of The Fab Designs from Polka Doodles. These images were from the NOT FOR GIRLS CD set l used CD 1 for imagery.
Now then How did l construct the card?
My first step l took the main Bikers image and then printed it onto velum. Now then this was not velum that was printable but l took a risk as l was going to use a laser printer. The result was a fab grunged up image.
I then took the Bikers image into Adobe Photoshop. The image was in Portrait mode as l was making a card that was 20cm x 20cm there was some fab imagery at the top. So l cut it from the back ground and then placed it into a new layer. Then by using a blending mode l found a look l was happy with. Part of the bikes white imagery was missing so l had to put a 'photographic mask' onto the layer and then using a brush with black.
[Quick Info bar.... When you are using a mask in a photographic program when you make a mask its as if you had a piece of see thru paper on top of the image. If you painted it with black then the imaged painted would be covered. The reverse happens if you paint with white.]
Now then when l was happy l just printed it out.
Using a make up sponge and Black soot l treated the edges of the printed topper.
I took my trust old Big Shot and one of the sizzix paper embossing plates. [We do some times forget that they are there and are just as good as the embossing folders.] I then embossed using two contrasting plates to give an intrested battered look.
Taking the velum l ripped it so that l was only going to use just under half of the treated image.
Taking both the velum and the photo l used my hole puncher and punched out several holes that l was going to use silver embellishments. When I was happy l then fixed both layers together and put aside.
Now then the card. I had some old silver gaffer tape and thought that would give an interesting feel and texture to the card so l ripped and stuck round the edges. I had just enough to cover where the topper wouldnt be seen.
it was missing a wording topper so once again l went looking round the cd and found this one.
Once again l printed it out, ran it through my cricut and an embossing folder. Then using a circle punch l punched it out. Then it was distressed using Black Soot.
The wording needed a base so l took some silver card punched out using a punch. Then set about it with some sanding block. When it had been grunged up l ran some black soot over the edge and whiped it off using a paper towel. I wanted an brushed steel effect.
Placing the text onto this topper and then placed onto the card.
There you have it my first card in my very first challenge. It can only get better lol
Keep Crafting
Alan


Comments
Post a Comment
Please leave your message here. As soon as it has been verified it will be shown on the blog. This is to just keep out spammers and people who would like to sell their products and not show an interest in what they have see on my blog. Thanks for your patience in this matter