CELEBRATE THE DREAM STEPPER CARD

For this project i
went back to a wonderful set of stamps from LYNNE PERRELLA Collection Published by PAPERARTSY called COLLECTION LPC005. This set of
stamps and a wide collection of other stamp sets are available from THATS CRAFTY ON LINE. All the
goodies highlighted are also available from Thats Crafty on Line Store. Just
click on the link and it will take you right to the item so you can add it to
your crafting shopping basket at prices that are very easy on the
pocket.
i also went back
to a card design that i have not explored for a long time: The Stepper Card. it
a design that does allow us to be creative and build up a
picture.
MATERIALS
NEEDED:
A4 Gold Mirror
Card
Selection of Metal
Dies from Spellbinders
Die Cutting
Machine
Gold Metallic Gel
Pen
Magnetic Poetry
Magnetic Word Stamps
Paper
Trimmer
LETS MAKE A
CARD:

The first thing we
need to do for this project is to make a stepper card. For this card we need to
have the center part as the one that comes to the front. if you dont have a
template to cut out a stepper card let me know and i will see if i can upload
one or send one via your email.

Start to stamp up the
imagery that you want to use. As you can see the banner set from this set of
stamps does allow you the opportunity to bend the stamp and make as usual with
Lynne Perrella stamps the perfect impression. Like all stamping its the paper
that you're going to stamp on. So if possible always buy the best stamping
paper/card that you can afford. Then place them into a container to keep them
clean and safe.

After you have
stamped out all the imagery you want for the project we can now start one of the
best bits in the wonderful world of stamping, selecting the colours we want to
use and then colour. Start to build up the story we want to show.


After i had placed a
layer of colour onto my stamped out imagery i took my mister and a roll of paper
ready to start the next process. i had to spritz a layer of water on the side
bars and the main topper. The reason for the paper towels was to soak up as much
water as possible. As the distressing pens react to water and will 'spread' by
soaking up the water as quickly as l could to stop the colour from dissipating
and then leaving just a mess. Once l had done the paper towel i grabbed my heat
gun to dry the stamped and coloured image as quickly as possible. When i was
happy with the result i took a golden gel pen and placed some colour along the
crown and frame.


To make thing easy for myself i took
some metal dies from a spellbinders set and then ran them through my eBosser.
When it came to cutting out the gold mirror card all i had to do was to select
the next die up in the set. i opted to use a die rather than use a pair of
scissors and a corner edge punch. i just opted for this option to save some
time.

After i once again used a metal die
the next step for all the mirror card cut-outs was to distress the edges. i
wanted to do this so that it looks worn and aged. it also when the next step is
done helps a lot.

To make the edge of the mirror card
stand out i used the edger to distress the edge. When i then took a inking tool
to the edge of the card that had been inked up with Rusty Hinge [a wonderful
deep rich colour]. As it was worn the ink took to it a lot easier. it also
makes the edge 'POP' out giving it depth. Also it can act as a layer behind the
card you have distressed. i like to use a lot of ink so that its a depth of
colour.

Taking the main image i wanted to
bring this into the colour scheme and not to be 'white and new' to do this i
used a ink pad and Tea-Dye around the edge. Then using the Glossy Accents l
placed a layer on the face as i wanted it to be slightly 3D when looked
at.

For the banner i had to build up a
clear building block. Acrylic glue is the perfect way to do this as it can build
up a firm block of glue that when dry can be then re-glued and secured to where
you want them to be. i could have used dimensional pads, i would have had to use
a lot to build up the dept that i wanted. The banner had to stand out as i
wanted depth.
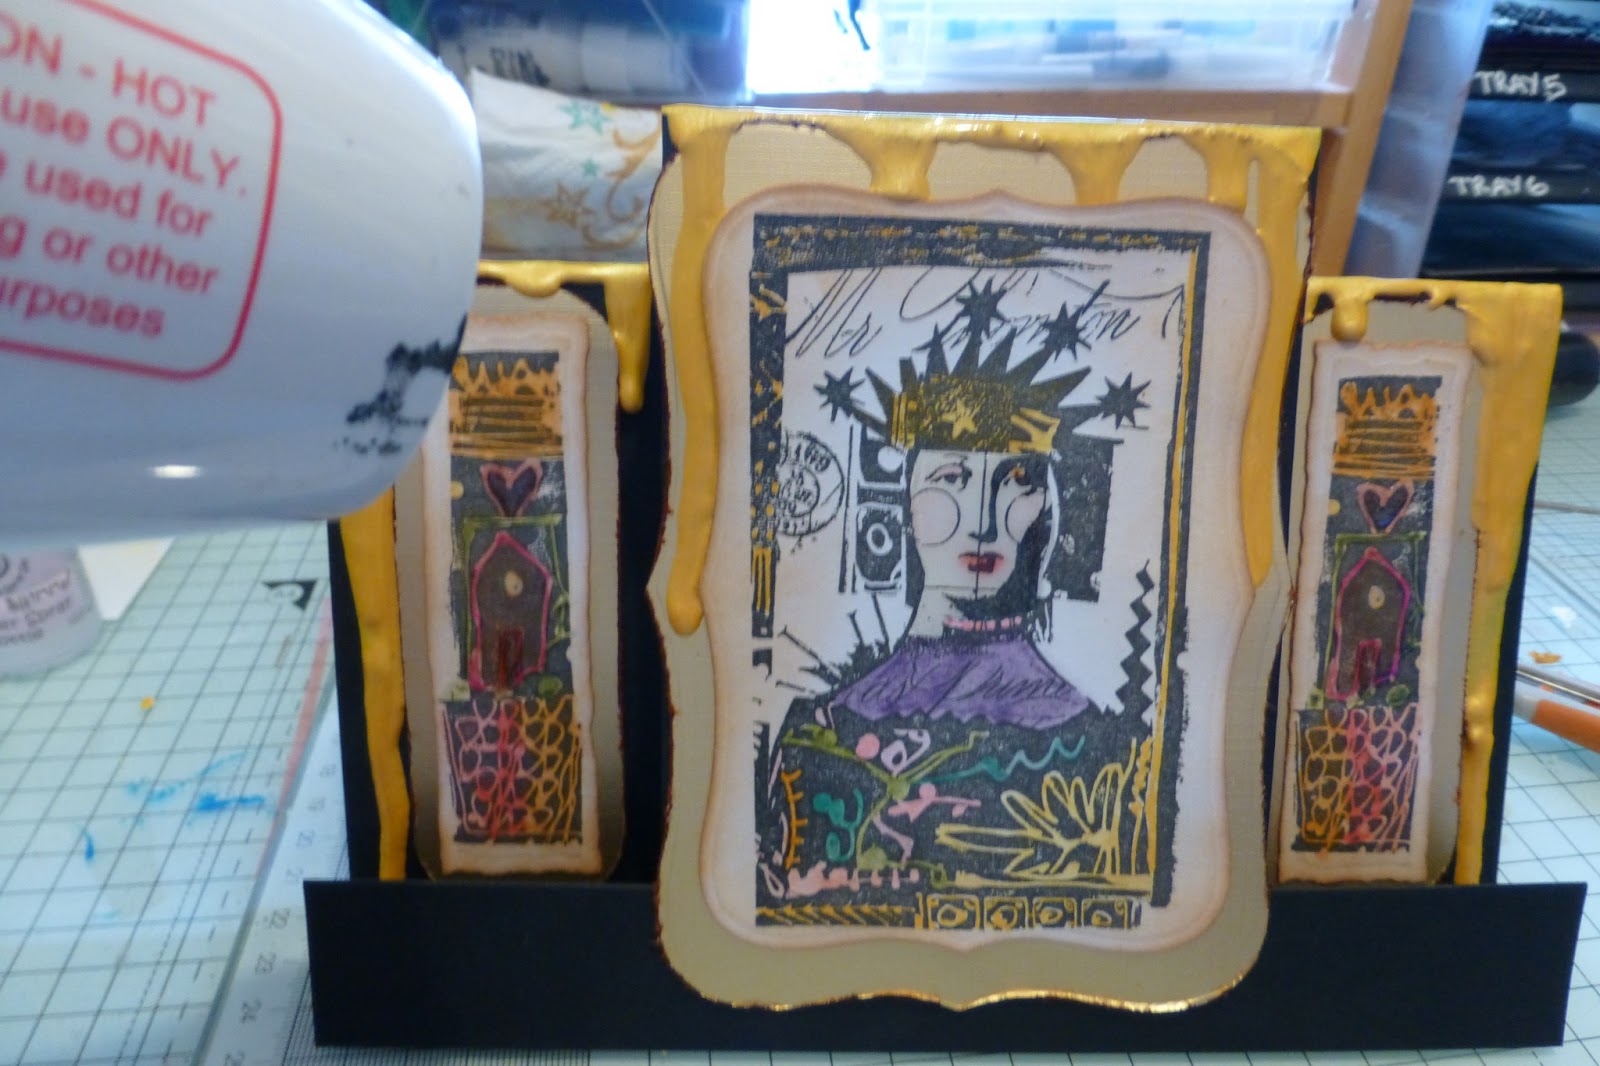
Now then this could be the part that
will scare a lot of you. i have to admit its one of those 'in for a penny in for
a pound' moments. You just have to have faith in your crafting ability. the aim
is to let paint drip down from the top edges, if you get the paint to be like
double cream your going to be okay. mix up your paint and then take your spatula
and scoop up some. the aim is to use the spatula as if it was a knife and you
are spreading butter on some toast. If you want to help it form drips pick up
the card and just bang it carefully on to the table. Using a heat gun will help
stop the paint and dry it so you do have some control over the action of the
paint. You want to do this using your 3 colours just do the same take your time
and it will be okay. if you are not comfortable practice. We all had to start
somewhere , i have used up quite a few sheets of old card trying to get this
right. This card was never thrown away but became backdrops to other projects.
i'm a crafter i do not throw anything away.

i have been lucky enough to buy a set
of 350 words. The only downside to this purchase was that they were all in their
own box and were magnetic. At first i was a little disappointed when i bought
them as i was after something else. But now they are a important part of my
crafting and creating. So don't worry if you buy something that you then think
Oh what was i thinking..... it will work out and you will find a place in your
crafting with them.

There you have it a stepper card that
was able to be embellished how i now do my crafting. i always thought that this
style and others would only fit into the way we normally use them. i have to
hold my hand up and say i think there is a reason now to revisit all the other
card designs and see what i can now do with them.,
i hope that this might inspire you to
have a look and maybe explore what you can do with an 'Old style' card design. i
say old but then isn't everything old as its all been done before? My old
lecturer at Uni once told me that in fashion nothing is new its all been done
before. The only real 'New' idea was the Mini skirt back in the 60's.
Take care look after yourself and
happy crafting. Any questions please send me a message and i will get back to
you a.s.a.p.


Hi Alan, oh wow what a fabulous card, I love the colour choice and your image. Your step by step photos and instructions are just brilliant. hugs Shirleyxxxxxxx
ReplyDeleteI had fun reading every word. I love your card! You have such wonderful ideas to make any image look fabulous. Such a wonderful step card. I just wish I could be closer and see them in real life.
ReplyDeleteVicky Briggs