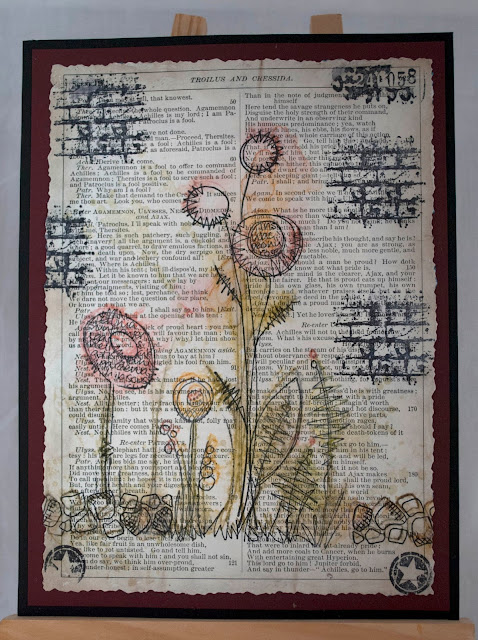
FLOWERS 4 SHAKESPEARE
All you need is a sheet of paper from an old book and some simple lined stamps. Here i have used stamps from a NEW to me stamp designer JOFY. i have been luck enough to add a few of the stamp sets to my collection and lm eager to add some more soon as l see a longevity in the designs. To embellish the topper i have used from the Tim Holtz Stamps Collection BITTY GRUNGE stamp set. These are all available [stock willing] from THATS CRAFTY ON LINE [if they are not available please email Laura and im sure she will contact you when stock is back in store.]
MATERIALS USED:
JOFY 12 and 09
Tim Holtz Stamper Anonymous Collection - Bitty Grunge
A5 sheet Paper from an Old Book [PLEASE DONT rip out a sheet from a PRECIOUS BOOK]
2 x A5 sheets of Topping Card. Here i have selected colors that are from the colour range used in the stamping.
A5 sheet Plain white paper
Selection of Tim Holtz Distressing Pens
Archival Black Ink Pad
Heat Gun
Water Spray/Misters Bottle
Distressing Edge Scissors
Double sided Tape
Post-it Notes
Thin Black liner Pen
Tim Holtz Ink Pads: Tea Dye and Old Paper
Blender Tool
LETS MAKE A TOPPER:
Using your scrap paper build up the image that you want to build. We are doing this as the Old Paper that will be stamped on in the final topper, has to be treated as a 1 stop stamping plate. Practice as much as you feel you need .Try different placements till your happy with the final construction. Us the black pen to get used to adding lines and joining in where needed as this will come in handy after we have stamped the black outline. The key words are. PRACTICE....PRACTICE....PRACTICE.
Now then its time to start to build up our image. Select your colours from the Tim Holtz Distressing Pen Collection and add colour onto the stamp. This will then be repeated with all the stamps needed to build up our composition.
When your finished with the stamping take the Spritzer Bottle and lay down a light layer of water. Allow this water to soak into the stamped image.
When your happy with the overall look. Take the heat gun and dry the image as quickly as you can. You don't want to leave the paper to air dry. As by doing that your going to allow the distressing ink to spread out further and your going to loose what depth of colour you were aiming for.
Taking the Archival Ink start to stamp over the distressing stamp image. Then using the Black liner fill in those areas where the stamped image doesn't quite look right.
All thats left to do is to build up some more intrest onto the paper. Here i have used the Bitty Grunge stamps as they are the right size to just Frame the Main Stamped Image. i took the star to stamp into all 4 corners to look as if it had been 'Pinned' to the card.
After all the stamping had been done, taking the distress edged scissors i cut around the page. This is optional you can leave it as is or just rip the edges. i didn't want 3 straight edges and 1 torn.
Then all that was left to do with the main topper was to take the Tea Dye and Old Paper ink and blend the edges. This is just to 'Age' the paper that little bit more.
Final thing is to secure onto your chosen card using double sided tape.
There you have it a simple idea that looks as if you have painted it and drawn round it yourself. So dig out those stamps and start to play.
Car boots and Charity shops are a wonderful place to re-cycle old books. Try to keep to books that are mostly text, have stained edges and have been glued when it came to stitching. Old books when not precious can be given a whole new lease of life by us crafters in a whole bucket load of techniques.
Any questions please send me a message and l will get back to you a.s.a.p.


Oh wow Alan a fabulous tutorial will have to give it a go, love the idea of using the pens like that onto newsprint. A stunning result, hope you doing OK. hugs Shirleyxxxxxx
ReplyDeleteHi Alan ..A fabulous creation and tutorial too. Just wanted to pop by and say congratulations on joining the SplodgeAway DT!!!! Me too... am still pinching myself. Am so looking forward to working with you and seeing your creations too. Would like to follow your blog aswell but couldn't find the followers section, if you could let me know. Well done again....exciting isn't it!!
ReplyDeleteBest Wishes and Haappy Crafting
Carol Tadden x
Big thanks to all who have left such nice words about what they have seen on this post. So pleased to have sparked a light of creativity.
ReplyDeleteCarol can you email me as l cant find an email to contact you..
Also if you would like to follow this blog the link to join is just below MEI Flowers Information.
Thanks again for visiting the site
Beautiful artwork Alan, love those stamps. Its lovely to 'meet' you and i'm really looking forward to being part of the SplodgeAway DT with you
ReplyDeleteHave a lovely weekend
Claire xx