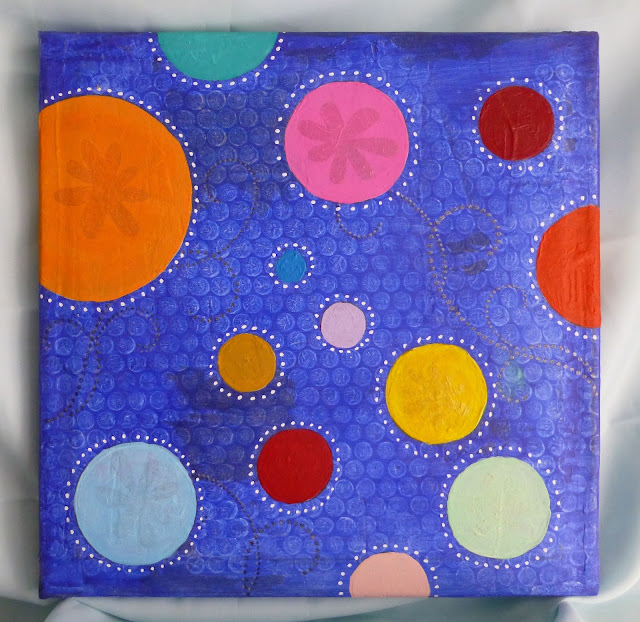
COLOURED CIRCLES ON A BLUE BACKGROUND
i thought i might do something a little different for this weeks 'How 2 Make' i thought about making some wall art.
This project was made on a 12 inch canvas but please don't let that scare you or put you off having a go at something like this. There are hundreds of old picture frames out there that are screaming out for a new lease of life. So just replace the canvas with some paper insert and then place on a wall.
Once again this has been a journey as the original concept was as we say 100 miles away from what it ended up. i also have to apologize for some of the photos they are blurred and l also missed out one section which isn't of great importance so a few extra words will be okay.
The main products of this project are ACRYLIC PAINTS. after playing with some i found that ECO GREEN CRAFTS ACRYLIC PAINTS gave the best coverage as the paint is thick and has a strong colour hue which covers what is under very well.
These paints as well as a wide range of other crafting goodies are available from THATS CRAFTY ON LINE. A visit your not going to be disappointed with.
MATERIALS USED:
12 x 12 inch canvas [cheapest one you can find].
White Gesso
Selection of Eco Green Crafts Acrylic Paints.
Wide tipped Brush and a Fine Tipped Brush.
White Marker Pen
Glitter Pens Both Coloured and Clear.
A 12 x 12 sheet of USED Bubble Wrap.
Template of your choice here i have used Circles but you can use one with Squares, Ovals, Hearts etc.
Paper from Old Books to give strength to the canvas.
Tub of 50/50 PVA Glue and Water to secure the paper onto your canvas.
Moulding Paste [to make the surface level and cover the lines made by layers of paper]
Heat Gun [USE LIGHTLY]
Pencil
Mod Podge Mat
LETS MAKE SOME WALL ART
As i was not sure as to what i was going to do next i placed a layer of White Gesso over the canvas. Getting ready to help with the layers of colours the project was going to involve.
i opted to give the canvas a layer of Bronze thinking that it would make for an intresting back ground.
On second thoughts the Bronze was not a good move.
Once i had opted to change the direction, i took the moulding paste to make the surface of the canvas level and cover up the surface that had some warping in the paper.
Once the moulding paste dried i took a sanding block and sanded the paste so that the final surface was flat and had no ridges.
This is where i jumped in got excited and forgot to take a photo. The Blue was just so vibrant i couldnt wait to do the next step.. BUBBLE WRAP!
To protect the back ground i used some Mod podge to protect the base.
This is where the fun starts, after selecting the template i wanted to use, a soft leaded pencil i started to build up the design.
SORRY ABOUT THE PHOTO! The selection of paints that were going to be used.
To help with the saturation i first decided to lay a layer of white Gesso and then mix in the paints with the gesso so that it leftdiffering shades of that colour.
The next point where i decided that i had to make a change. the mixing of the gesso and the paints was just not working for me . So i decided that i wanted a flat colour.
Once the paints had dried the next step was to take a strong white marker pen and place dots around the circles.
The finished circles and dots.
There was something missing the background just didn't feel right. So i took a dotted flourish mask and started to build up flourishes in the background. These flourishes didn't go over the circles but were to look as if they were behind them. A coloured Gel Glitter pen was used first.
Then to look as if the dots were shadowed i took the clear gel glitter pen and put the mask just a little of sync. This would make it look as if it was shadowed.
The final part was to take a flower template and using a clear gel glitter pen in the centre of the larger circles.
There you are a simple art project that by just using some paints and a template or two you can build up some modern art.
As l stated at the start you don't have to use a canvas your able to transfer the skills in this how to make onto a paper surface and then securing into a frame that you have found and treated from a car boot or charity shop.
Any questions please send me a message and i will get back to you a.s.a.p.


Comments
Post a Comment
Please leave your message here. As soon as it has been verified it will be shown on the blog. This is to just keep out spammers and people who would like to sell their products and not show an interest in what they have see on my blog. Thanks for your patience in this matter