THE HAPPY COUPLE

When i say good its worth while in the long term to pay that little more. i have bought a tub of white gesso from a high street store that cost £5.00. it was gesso but such a watered down liquid it could'nt cover a white sheet of card never mind a canvas like this one.
So its best to buy a branded tub as it will cover the surface a lot better and save you money and time long term.
i revisited an old faithful set of stamps for this project. it just goes to show that these sets of stamps have a long life and not just like some out there that are '1 trick ponies'. Again they may be a bit more expensive that some but they do have a long life when it comes to crafting. One thing i have learnt while crafting.. sometimes cheaper isn't the best and for those few extra pennies you get a quality product. The products used here are 99% available from THATS CRAFTY ON LINE [who have just had a up-grade on their web site so is now so much faster and easier to navigate!].
Where i have used a project i have highlighted a product that will be a very good alternative. Over the years we all collect different products so we all understand that we do have differing products.
This project does rely upon items that i have explored in different projects on my blog.
PRODUCTS USED:
10 inch square canvas thats been reclaimed.
Dylusions by Dyan Reaveley: Dependable Dotty ~ Pondering Petunia ~ Back Ground Love ~ Basic Backgrounds ~ Bits of This ~ How Does Your Garden Grow ~ Right Up Your Street
Black Gesso
Stazon Jet Black Ink Pad
Stamp Cleaner for Stazon Ink IndioBlu
Tim Holtz Black Soot Distress Marker
White Tile
Water Brush
White Stamping Paper
Scrap White Paper
Black Waterproof Drawing Pens [Try to build up a collection of different widths. They last and are worth that extra few pennies for them.
Scissors
Tim Holtz Distress Embossing ink pad
Clear Gloss Embossing Powder
Strip of Dry Wall tape and Silver Plumbers Tape [Raid your partners' D.I.Y space!]
Eco-Crafts White Acrylic Paint White or White Gesso
Prima Mounted Stitch Stamps: Lines
Collage Decoupage Glue
Glue Stick
Craft Knife
Cutting Surface
Heat Gun
Cosmic Shimmer Clear Varnish
Cosmic Shimmer Clear P.V.A. Glue
Posca White Pen
Dimensional Tape
Ruler
Black Soot Distressing Ink Pad
Distressing Tool
Print out of Computer Typeface Text
Silver Holographic Metallic Card
Cricut Electronic Cutting Machine
A PERSONAL STATEMENT:
These stamps are not cheap! However if you look beyond the price then you will see that i personally have had possibly 18 months of using them so the price was well worth it. i have hundreds of stamp sets that are in white plastic containers and they are just put on a shelf and the ones i use all the time are in another container close by so i can dip in all the time. So some of the stamps in the Dylusions Range are must haves, while some are mm okay maybe later ones if you know what i mean. I like to be honest with you all when you read my blog. its not worth my while trying to show you something that i feel isn't worth it.
During these times crafting to some crafter's is a luxury as the money is needed for other items. So when i say something is going to be a long term investment i mean that with all honesty and sincerity. i'm not in the habit of trying to push something that is not quality. I know that Laura is also in the same position as me. We don't like the idea of people not get value for money. Yes you can buy something cheaper but a different brand, i have learnt to my own cost that its just isn't worth it in the long term.
Like i mentioned that this is a project where we are going to use items that we have in our collection already, or there may be an opportunity to re-visit some of my earlier blog entries to see that these stamps have a long life in them and are not just like a lot out there Useful for just the one or two projects and then put away in a file box!
LETS MAKE A CANVAS FOR A WEDDING PRESENT IDEA!
Now then we have been round several car boot sales and found some canvases that were originally bought to hang on the wall, with the intention of Home Design.
i came across a set of 4 that were bought for would you believe it 25 pence EACH! As they were massed produced they will have a easy clean surface on them.

A nice thick coat of Black Gesso is just what is needed.

Using the drywall tape place two strips close by to each other. The silver tape is there just to hide the joins. As the tape isn't equal in the gaps there is no great need to be 100% accurate. Then to help protect the tape a layer of Decoupage glue is used. This layer will take a paint medium so there isn't any issues for further layering.

As an after thought i decided to protect the black gesso layer so once again i used the same medium to protect it.

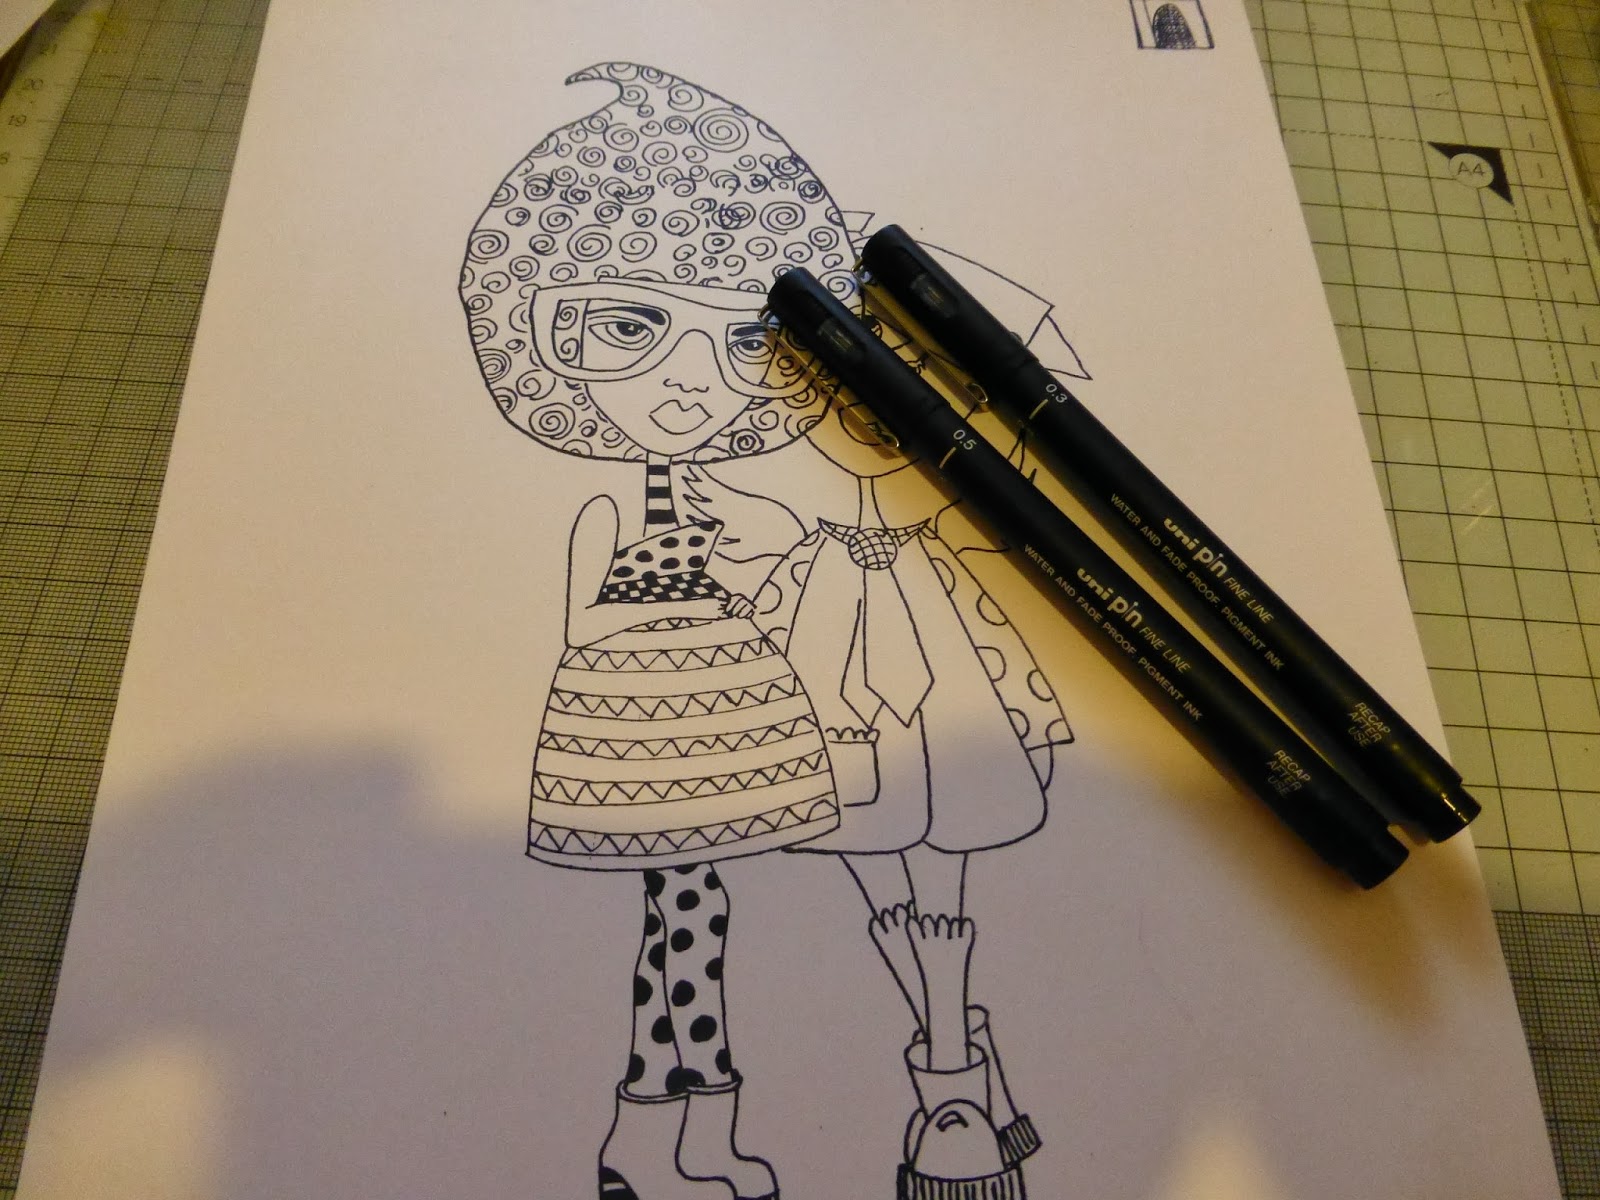
While the canvas is drying we can get started with the images. For the figures i decided to use the stamp sets below. Th only bit of technical crafting is the hair for the bride!

Taking the stamp figure from the Pondering Petunia i inked the stamp up and made an impression on the stamp paper and then while it still had some ink on i re-stamped some scrap paper so i can make a mask for later.

Using a piece of scrap paper the next step of the project is to make a hair cut out. Be as wild as you want or be as neat as you want its your call now. Here i have gone for a kinda combed back with a quiff look. Make sure that the base of the hair matches the line at the top of the head..

After the section has been cut out using a crafting knife and cutting mat. You can use your scissors however i would strongly advise you to use a craft knife as the following steps will show you. the middle is discarded but kept safe as it will be needed later. its the cut out area or mask that we are going to use.

Place the stamped out figure first onto the stamped image on the white card, secure with a little dab of glue from a glue stick. Then place the hair mask on top of this so you have a 2 part layer stack.
1. The stamped image on the stamping card.
2. The stamped image on photo copy paper
3. The hair mask/template.
Then using the stamp you have selected for the hair here its a stamp from Background Love. As its a patterned one there wasn't a great deal of matching up to be done. Just be careful when placing the stamp.

After the hair had been stamped and while all the layers were still in place its a perfect opportunity for the next stamped layer. Remove the hair template and place over the hair impression the middle that was cut out

Placing the figure from the Dependable Dotty stamp set ink up again with Stazon and make an impression so that it will look as if the figure is standing behind the female image.


After all your hard work stamping and masking and layering it should look something similar to this.

By using a black micron drawing pen your able to join any lines that are not quite matching. Use a waterproof black pen for this stage.
In the Bits of This stamp set there are two flowers that can be used to make up the bouquet of flowers for the bride. This time we are going to stamp onto silver metallic style card. So the Stazon ink pad is used again. This is the best ink pad for stamping onto non porous surfaces. One of the smaller houses in the Right Up Your Street stamp set would make the perfect Church in the background.

i wanted to make this a black and white project. As i had used Stazon im able to use a water based material. So armed with my Black Soot distressed pen, a water brush and a white tile l started to lay down colour just highlighting areas. Just relax experiment with some paper that you used in the stamping. Its just like using your water based coloured brushes. Only this time we will be using the one colour, by adding more water to the mix your able to give a lighter layer of colour.

When the stamped image was as l wanted it to look the next step was to cut it out. This was done using both a good pair of sharp tipped scissors and a craft knife leaving a small gap surrounding the image, don't worry this will not show up. Using the same black Gesso that we used in the covering of the canvas this small extra from our stamped image will be covered up using a fine tipped brush and the gesso.

Now then its time to get back to our canvas. There is a wonderful set of stamps from Prima. Its a set of sewn image stamps in Straight lines, Circle Frame, Square Frame and Rectangle Frame. They are cling backed and to me can become a very good investment for future projects.

i opted to use one of the straight lines sewn stamps. Again Stazon was used as im going to be stamping onto a non porous surface.

The stamped layer. When dry i once again put a layer of Collage Glue over the image to protect it.

To give more interest and definition i opted to use a white paint. This Eco-Friendly acrylic paint is very good for covering surfaces. If you don't have it close to hand [its a very good paint that's highly recommended as a true white is hard to find]

This is what i did. selecting certain squares i filled them in with the white paint. If you don't have this paint in your crafting supply box while your waiting for it to be delivered white Gesso will work.

The background wanted something as it was just flat.


As the flowers were draw it was quite easy with a steady hand to separate them so i had in effect to have 2 separate flower heads and stems. By giving the stems a thicker base using a black pen the line was drawn. Then to make it look as if they were being held i just cut the flowers from the stems at a point where it would look okay to hold them. Then with some Cosmic Shimmer Clear P.V.A glue l secured then on top of the hands and then the stems below the hand. Overlapping the flower heads made it look bigger and as if they were part of the image.
The Cosmic Shimmer Clear Varnish was used in the glasses to make it look as if there was a layer of glass. Its all about layering even if they are small its still part of a bigger picture.
The Church was also secured to the canvas using the Cosmic Shimmer Clear P.V.A glue.

i wanted to put text on the canvas so that it looked as if it was a card or a hand crafted present as a keep sake. So after looking through the text on one of my cricut cartridges i say this phrase. Also it came in had as l did make an error. while i was painting the outline using the black Gesso it was not quite dry and as i was handling it i smudged the male figure around the collar area. it did stand out so i went into panic mode. However while i was searching i came across small flower shapes.. PERFECT i could give the male figure a flower pin and i can cut out small flowers to put on top of the flowers i already secured into place.if you enlarge the photo above you can see where i placed the flowers and fingers crossed it covers up my error in judgment.

After looking at the canvas the following day the text i had placed onto the canvas just didn't look right. A panic haze descended upon me. After all that effort i had put in it could be ruined and i would have to start again. So the lesson here i have learnt is don't place the text down securely until the following day and i have looked at it with fresh eyes. i grabbed the same card that i had used before and cut out a rectangle. Just big enough to cover the space where there was glues parts from the other text, but small enough to leave a border of the tape as the last thing i wanted was to cover it all up.

After it was cut out i took a distressing tool and worked on the edge. This was then ink using a Black Soot Distressing Ink Pad. Using a Black marker i drew a box a centimetre inside.


i wanted to have that symbol that's in a lot of wedding imagery and thats Doves. This is where How does Your Garden Grow come in. i could use the birds as a symbolic image. They don't have to fly so by placing them on the ground without legs it kind of gave that impression. These again were coloured around the outside edges by using Black Gesso.

The birds in place. You can also see the flower heads and the flower on the collar, that i mentioned a little earlier in the blog.
There you have it a different style of wedding project it can be changed over with a little tweaking using the stamps from this collection of stamps to fit almost any occasion.
Any questions please send me a message and i will get back to you as soon as possible.


Hi Alan, oh wow yes I can see those stamps are definitely you, they are fabous and what youve done with them is brilliant. A fabulous tutorial to. hugs Shirleyxxxxx
ReplyDelete