DIGITAL MIXED MEDIA Project No. 5 ~ THE STEAM~PUNK MERMAID CANVAS
This was a project l have had in the back of my mind for a while. I didn't know if it was going to be done on a canvas [which it was] or my other sub-strait M.D.F. Board [9mm].
Anyway in the end l went with the canvas as in all honesty l was not going to end up putting it in a frame as those tend to be my mdf projects.
I once again dived into the wonderful digital works from Deb's from DKERKHOF [XQUIZART]. She does the most wonderful Art Dolls along with accessories that enable you to make a story using these Dolls. [I keep asking her for some Men Art Dolls she says she is WORKING on them so maybe if we all ask her then we might get some hehehehe] But l do know it take a lot of her time to make the collections that she does provide to us Mixed Media Peep's.
To have a look at what Deb's is bringing to the creative table have a look at her On-Line Store and her Blog. I will place the links below so you can click and a new window will open right at the store/Blog.
To VISIT The ON-LINE STORE: >>>>>>>>>> LINK <<<<<<<<<<
To Visit Deb's Blog: >>>>>>>>>> LINK <<<<<<<<<<
To have a look at another site l have running with my older work as well as some Photographic projects l have done in the past PLEASE Click on the Link below:
To Have a Look at my On-Line Portfolio: >>>>>>>>>> LINK <<<<<<<<<<
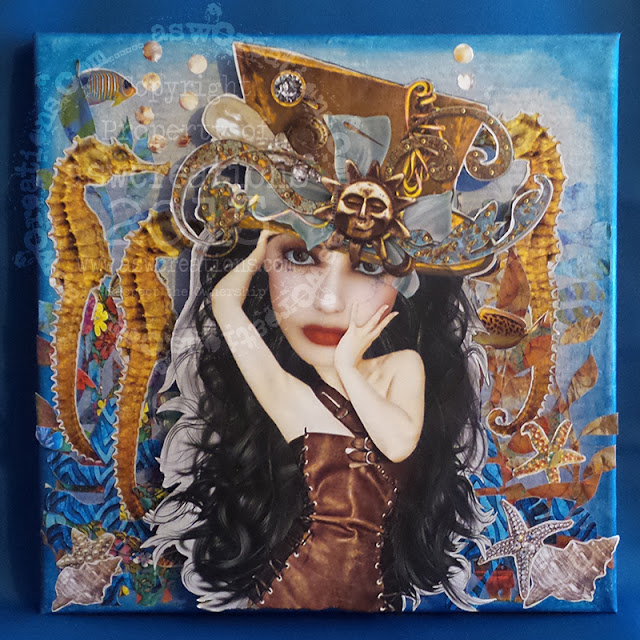
Right then lets talk about this project.. I have wanted to do something with this Art Doll for a long time now as She is one of my fav's!!
This time however l decided not to have her as the mermaid that she is well Digitally drawn as with a fish tail that is ULTRA Steam-punk in style.
However when l blew the original image up to 10 inches tall.. You can see that the definition has not dropped at all proving the image can be used very very small and like this it would have been almost 19 inches tall.
When l did enlarge her l noticed that her hair did not stand up as well as l wanted it to.. This is just the only draw back l came across but then due to my O.C.D in some issues l had to do something.. It was PERFECTLY fine as it was I just wanted a bit more depth.
That was all done in Photoshop and as l mentioned on film if anyone wanted to know how l did it and there were enough of you to want an video then l would make a video. The process is quite easy and could be transferred to everyday projects.
The paints l used were from Tester Pots bought from a local D.I.Y. Store. Showing that you don't have to pay a fortune for paints.. However only buy these for your creative needs where there is a SALE ONLY!.......... DO NOT PAY EVERY DAY PRICE!
I also show in the video that comes with this project that you can take something that's made by Deb's in one of her kits and then turn that into a SVG file so that your able to then digitally cut out the silhouette shape from another paper source. In this case l selected several of Deb's flowery papers and some that have waves in the design so that it would look like flowers under the sea as well as the waves giving a feeling of movement.
Then the Sea horses, fish, starfish and shells were printed out then using a Blue Grey No3 Alcohol pen around the edge of the image so that when l cut them out l was not faced with white areas but grey blue which can look like shadows and not the stark white which is something l personally don't like. I would rather have Black outlines.
Once the back ground had been done and then the flowers, fishes etc were all in place it was time to place the focal point. Using my Xyron l put a layer of glue on the back of my printout.. In this case the print out was a laser print. Something l do say is very very useful and gives out better imagery.
There are deals on all the time now if you buy the toners you get the printer free! This can be a little pricey but if you are part of a 'Creative Crop', then pooling your resources you might/could be able to afford to purchase one for the Crop. However l have had perfectly good results with inkjets.
There are several ways to use Inkjet prints in WET Mixed media project.
Here is a list of things I have found works. However l cant say 100% that these are the definitive ways.
1. Use a Pastel Powder Spray [Not cheap but they do last. They will also make the paper curl]
2. Use a Cheap Hair Spray.
3. Paint a thin layer of Playtime PVA glue over the print out. I have put a layer of glue on the reverse side of the print which will soak into the paper. Then the front. This can make the ink on the paper wet again so you have to be careful.
4. Let the print AIR DRY for a few days [I have been told that use a HOT DRY Iron on the print will also Set the ink and help stop the ink from being re wetted.]
There is a risk in everything. Its just a case of trial and error and finding out what the best thing works for you. Laser well you don't have that issue but there is a cost.
DON'T DON'T DON'T PUT YOURSELF INTO DIFFICULTY just to buy a Laser printer. Its not worth it.. Maybe ask it for a Family Festival present or a birthday.. Get your circle to 'Chip-in'.
Here is the link to the video that goes along with this project.. I hope that you enjoy watching the video and that it inspires you.
Please leave a comment or a question if you want to know anything extra about what you have seen or heard from the video and if l can ask you to give me the BIG THUMBS UP if you did enjoy it.
>>>>>>>>>> LINK TO VIDEO <<<<<<<<<<
Thanks very much for all your support in what lm doing right now and for the support shown and the comments given for the projects l have done in the past. I hope to carry on Inspiring you and hopefully showing you that you don't have to forget all those creative tools we bought a year or so ago can not be used along side the creative tool we bought the other day...
THANK-YOU!!

Anyway in the end l went with the canvas as in all honesty l was not going to end up putting it in a frame as those tend to be my mdf projects.
I once again dived into the wonderful digital works from Deb's from DKERKHOF [XQUIZART]. She does the most wonderful Art Dolls along with accessories that enable you to make a story using these Dolls. [I keep asking her for some Men Art Dolls she says she is WORKING on them so maybe if we all ask her then we might get some hehehehe] But l do know it take a lot of her time to make the collections that she does provide to us Mixed Media Peep's.
To have a look at what Deb's is bringing to the creative table have a look at her On-Line Store and her Blog. I will place the links below so you can click and a new window will open right at the store/Blog.
To VISIT The ON-LINE STORE: >>>>>>>>>> LINK <<<<<<<<<<
To Visit Deb's Blog: >>>>>>>>>> LINK <<<<<<<<<<
To have a look at another site l have running with my older work as well as some Photographic projects l have done in the past PLEASE Click on the Link below:
To Have a Look at my On-Line Portfolio: >>>>>>>>>> LINK <<<<<<<<<<
THE STEAM~PUNK MERMAID Project.....

This time however l decided not to have her as the mermaid that she is well Digitally drawn as with a fish tail that is ULTRA Steam-punk in style.
However when l blew the original image up to 10 inches tall.. You can see that the definition has not dropped at all proving the image can be used very very small and like this it would have been almost 19 inches tall.
When l did enlarge her l noticed that her hair did not stand up as well as l wanted it to.. This is just the only draw back l came across but then due to my O.C.D in some issues l had to do something.. It was PERFECTLY fine as it was I just wanted a bit more depth.
That was all done in Photoshop and as l mentioned on film if anyone wanted to know how l did it and there were enough of you to want an video then l would make a video. The process is quite easy and could be transferred to everyday projects.
The paints l used were from Tester Pots bought from a local D.I.Y. Store. Showing that you don't have to pay a fortune for paints.. However only buy these for your creative needs where there is a SALE ONLY!.......... DO NOT PAY EVERY DAY PRICE!
I also show in the video that comes with this project that you can take something that's made by Deb's in one of her kits and then turn that into a SVG file so that your able to then digitally cut out the silhouette shape from another paper source. In this case l selected several of Deb's flowery papers and some that have waves in the design so that it would look like flowers under the sea as well as the waves giving a feeling of movement.
Then the Sea horses, fish, starfish and shells were printed out then using a Blue Grey No3 Alcohol pen around the edge of the image so that when l cut them out l was not faced with white areas but grey blue which can look like shadows and not the stark white which is something l personally don't like. I would rather have Black outlines.
Once the back ground had been done and then the flowers, fishes etc were all in place it was time to place the focal point. Using my Xyron l put a layer of glue on the back of my printout.. In this case the print out was a laser print. Something l do say is very very useful and gives out better imagery.
There are deals on all the time now if you buy the toners you get the printer free! This can be a little pricey but if you are part of a 'Creative Crop', then pooling your resources you might/could be able to afford to purchase one for the Crop. However l have had perfectly good results with inkjets.
There are several ways to use Inkjet prints in WET Mixed media project.
Here is a list of things I have found works. However l cant say 100% that these are the definitive ways.
1. Use a Pastel Powder Spray [Not cheap but they do last. They will also make the paper curl]
2. Use a Cheap Hair Spray.
3. Paint a thin layer of Playtime PVA glue over the print out. I have put a layer of glue on the reverse side of the print which will soak into the paper. Then the front. This can make the ink on the paper wet again so you have to be careful.
4. Let the print AIR DRY for a few days [I have been told that use a HOT DRY Iron on the print will also Set the ink and help stop the ink from being re wetted.]
There is a risk in everything. Its just a case of trial and error and finding out what the best thing works for you. Laser well you don't have that issue but there is a cost.
DON'T DON'T DON'T PUT YOURSELF INTO DIFFICULTY just to buy a Laser printer. Its not worth it.. Maybe ask it for a Family Festival present or a birthday.. Get your circle to 'Chip-in'.
Here is the link to the video that goes along with this project.. I hope that you enjoy watching the video and that it inspires you.
Please leave a comment or a question if you want to know anything extra about what you have seen or heard from the video and if l can ask you to give me the BIG THUMBS UP if you did enjoy it.
>>>>>>>>>> LINK TO VIDEO <<<<<<<<<<
Thanks very much for all your support in what lm doing right now and for the support shown and the comments given for the projects l have done in the past. I hope to carry on Inspiring you and hopefully showing you that you don't have to forget all those creative tools we bought a year or so ago can not be used along side the creative tool we bought the other day...
THANK-YOU!!


Comments
Post a Comment
Please leave your message here. As soon as it has been verified it will be shown on the blog. This is to just keep out spammers and people who would like to sell their products and not show an interest in what they have see on my blog. Thanks for your patience in this matter