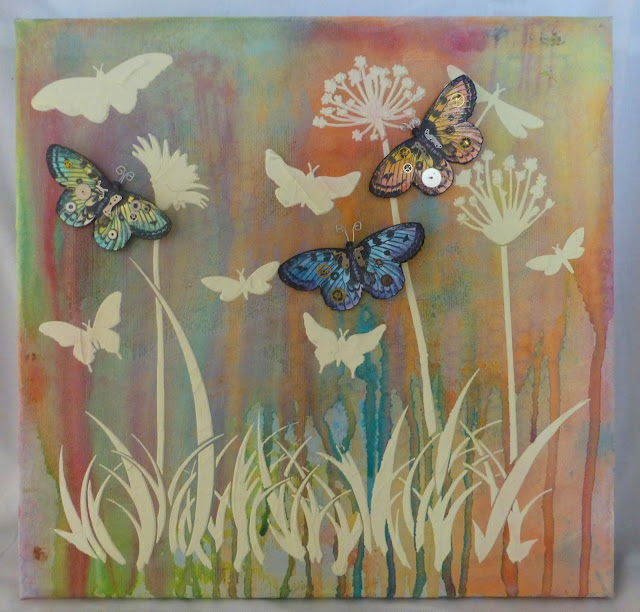
STEAMPUNK BUTTERFLY'S in a SPRING MEADOW
This project started out as one thing but ended up completely different from the original concept. So thats why i wanted to upload this one to show that you don't have to be afraid of letting a project take you on a crafting journey.
The main focal stamped imagery is a set of stamps from INDIGOBLU called WILD MEADOW, available from THATS CRAFTY ON LINE. While there why not explore the wide collection of original Stamp Designs.
The template used is a CRAFTERS WORKSHOP 12 inch Template. A Wide selection of 12 inch as well as 6 inch Templates from other Creative Designs Makers are available from THATS CRAFTY ON LINE.
MATERIALS USED:..
12 inch square Canvas.
White Gesso.
Paint Brush.
Water Craft Brushes.
12 inch Crafters Workshop Template [Spring Meadows was used].
Texture Paste.
Selection of Acrylic Paints [To colour the Moulding Paste to desired colour/hue]
Home Made Ink Sprays [See a few
Packet of Old Watch parts.
Plastic Spatula.
Selection of Tim Holtz Distress Ink Pens.
Cosmic Shimmer Clear Glue.
Versafine Pigment Ink - Onyx Black.
White Stamping Card.
Sharp Tipped Scissors.
Double sided Foam Pads.
Strong Clear Glue.
Marvy Jewel Picker.
Small mixing utensil and a mixing tool [i used a wooden coffee stick mixer].
Sakura Glitter Gel Pens
LETS MAKE A CANVAS....
Like i said at the start this was going to be a bright in your face with lots of bright colours..
However i was just not 'Feeling' how this project was going. So i placed it to one side walked away and then after a few hours looked at the canvas again.
There was only one thing to do.... Pick up the White Gesso and then 'knock' back the deep rich bright colours taking it back to what i felt was a blank canvas.
A few projects back i included in a project how to make your own Spray Paints using Acrylic Paints, water and a Mod Podge blending agent. So why not use these to make an interesting back ground to start all over again. As you can see i have dont the 'DRIPS' which is becoming a trade colouring of my projects.
Using equal amounts of an acrylic paint and a moulding paste in a small utensil. Then using a wooden stick i combined them both until it was all one colour.
Using a 12 inch template the next step is to place the mixed paste over the 'Open Areas' of the template.
After the paste had been placed all over the template using the spatula, its left to cure for 2 minutes, then carefully lifted from one corner then when 1 inch from the canvas the opposite corner is lifted using your free hand.
This is what your left with. Just allow to air dry. You could force the drying time by using a Heat Gun, but by doing this you can make the paste crack in areas.
Now its time to get creative again. Using the butterfly stamp i stamped it out 3 times onto good white card. As i was using water based colouring medium a Pigment ink was used. By using this form of ink it allowed me to use a water based colouring medium and the stamped lines wouldn't fade or be washed away.
The colour mediums and tools to be used for the butterfly's
While l was waiting for the butterfly's to dry i started to tidy up as you do when you don't want to.. i came across a small plastic container that inside of it was a collection of old watch parts that i had bought over 12 months ago. Thats when it hit me... i could make the butterfly's different from just the original way i was going to do them. For this i had to then locate my pick up tool.
i hope that you find this project interesting and i might inspire you to maybe look at your normal stamped images and think 'i wonder if.....?'
Any questions please send me a message and i will get back to you as soon as possible.


Beautiful project Alan, really love it, Zoe xx
ReplyDelete